Customer Request Setup
With the Customer Request Setup form, you can set up customer request codes. You can add/remove a request origin, request priority, request status, activity type, response type, assignment role, request action, and related documents. The Customer Request Setup is used to configure the values in the drop-down lists for the fields within a profile page.
Request Origin
- Customer Request Origin
- The method of communication a customer uses to submit a request.
Example: phone, e-mail, mail, web site, fax.
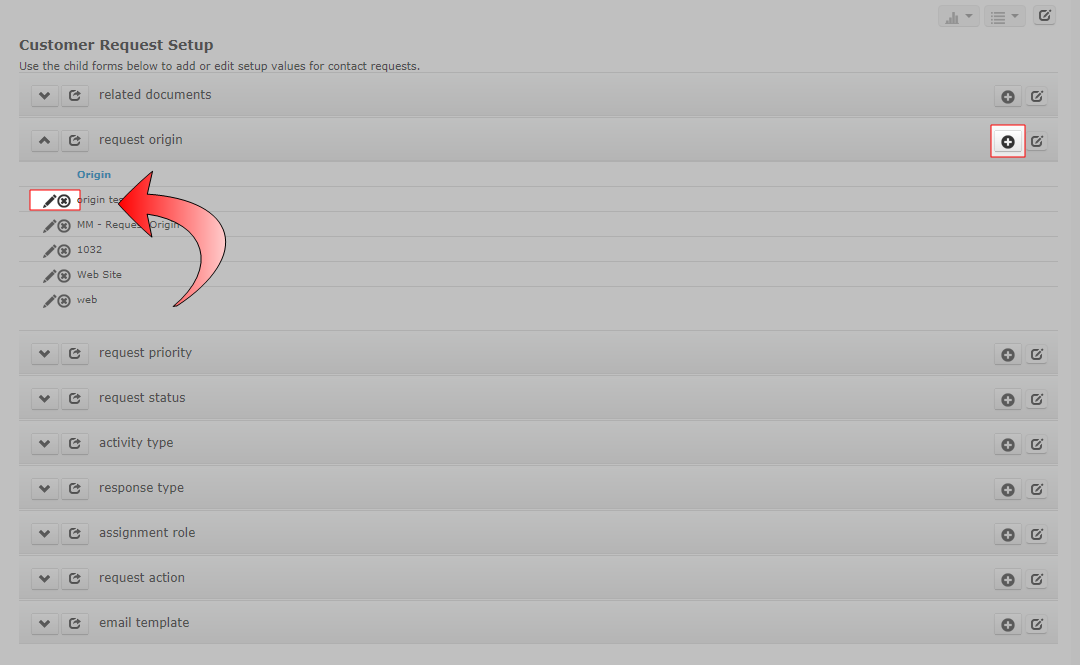
To Add a Request Origin:
- Go to the Customer Request Setup page.
- On the request origin child form, click the Add button.
- In the Add - Request Origin window, enter the request origin.
- Click Save.
The Request Origin drop-down list is located where in NetForum?
- In the CRM module, click the Requests group item.
- Select the Add Request group item link.
- The Add - Customer Request page will display.
- The (request) origin drop-down list is a required field located in the Request Activity section.
- The data will then display in the Customer Request Profile page.
Request Priority
- Customer Request Priority
- Indicates the urgency or priority level assigned to a customer's request.
Example: high, low, medium, urgent, extremely urgent.
To Add a Customer Request Priority:
- Go to the Customer Request Setup page.
- On the request priority child form, click the Add button.
- In the Add - Request Priority window, enter the request priority.
- Click Save.
The Request Priority drop-down list is located where in NetForum?
The priority drop-down list is used in three different Group Item Links within CRM:
- Add Assignment (Group)
- Add Assignment (Individual)
- Add Requests
- In the CRM module, click the Requests or Assignments group items.
- Select one of the previously noted group item links.
- The Add page will display for each respective group item link.
- The (request) priority drop-down list is a required field located in:
- The Request Activity section of the Add - Customer Request page.
- The Assignment section of both Add - Assignment pages.
- The data will then display in the Customer Request and Assignment Profile pages.
Request Status
- Customer Request Status
- A method of tracking the completion of a request from the time it is received to the time it is fulfilled.
Example: open, pending, approved, closed
To Add a Customer Request Status:
- Go to the Customer Request Setup page.
- On the request status child form, click the Add button.
- In the Add Request Status window, enter the request status.
- Click Save.
The Status drop-down list is used in THREE (3) different Group Item Links within CRM:
- Add Assignment (Group)
- Add Assignment (Individual)
- Add Requests
- In the CRM module, click the Requests or Assignments group items.
- Select one of the previously noted group item links.
- The Add page will display for each respective group item link.
- The (request) status drop-down list is a required field located in:
- The Request Activity section of the Add - Customer Request page.
- The Assignment section of BOTH Add - Assignment pages.
- The data will then display in the Custome Request and Assignment Profile pages.
Activity Type
- Activity
- A response to a customer request. Customer Requests are categorized by Activity Type and Activity Reasons.
Example: Activity type examples include: send membership information, fill an order, register an individual for an event, change an organization's address, research a customer's billing status.
An Activity Type often relates to a department while the Activity Reason relates to a function or topic within that department. The Activity Reasons are directly linked to their Activity Type.
To Add an Activity Type:
- Go to the Customer Request Setup page.
- On the activity type child form, click the Add button.
- In the Add - Contact Request Activity window, enter an activity code.
- Select the show online? check box if you want this particular Activity Type display online.
- Click Save.
Note: If you select the show online? check box, the customer will be able to make requests directly through eWeb.
The Activity Type drop-down list is used in THREE (3) different Group Item Links within CRM:
- Add Assignment (Group)
- Add Assignment (Individual)
- Add Requests
- In the CRM module, click the Requests or Assignments group items.
- Select one of the previously noted group item links.
- The Add page will display for each respective group item link.
- The (request) activity drop-down list is a required field located in:
- The Request Activity section of the Add - Customer Request page.
- The Assignment section of BOTH Add - Assignment pages.
Managing Activity Reasons
- Activity Reason
- A short explanation for a customer's request. These Reasons are added specifically to an Activity Type.
Example: damaged merchandise, status change, potential member, did not receive magazine.
To Set Up Contact Request Reasons:
- Go to the Customer Request Setup page.
- On the activity type child form, open the yellow folder to the left of the activity.
- The Reason grandchild form will display.
- On the Reason grandchild form, click the [add reasons] link.
- In the Add - Contact Request Reason window, enter a reason code for the request (the activity drop-down list will default to the selected activity).
- Click Save.
The Reason drop-down list is located where in NetForum?
- In the CRM module, click the Requests group item.
- Select the Add Request group item link.
- The Add - Customer Request page will display.
- The reason drop-down list is a required field located in the Request Activity section.
- Since reasons are dependent upon the Activity Type, only reasons assigned to that activity will display in the drop-down list.
Managing Activity Request Roles
- Role
- The job responsibility of the person handling a customer request.
In this usage, the Role is specific to the Activity Type.
In the example below, the activity type is Sending Membership Information. The user name might be the first initial and last name of the employee sending the membership information i.e.the employee handling the request. The default role might be the title of the person sending the invitations (Membership Administrator, Meeting Planner, Events Coordinator, Public Relations Specialist etc.).
To Add a Request Role:
- Go to the Customer Request Setup page.
- On the activity type child form, open the yellow folder to the left of the activity.
- Click the [add role] link.
- In the Add - Request Role window, select an activity from the activity type drop-down list (this will default to the selected activity).
- Select a user from the user name drop-down list.
- Select a assignment role for this activity type from the default role drop-down list (See Assignment Role Below).
- Click Save.
Adding a Correspondence Template
- Contact Request Correspondence
- An e-mail message sent in response to a customer's request.
Example: renewal notice, online newsletter, advertising promotion, potential new customer or member.
Note: You can set up a default correspondence template by setting up the ContactRequestDefaultCorrespondenceTemplateGuid system option.
To Add a Contact Request Correspondence Template:
- Go to the Customer Request Setup page.
- On the activity type child form, open the yellow folder next to the activity.
- Click the [add correspondence templates] link.
- The Add - Request Correspondence window will display.
- Select an activity type from the activity type drop-down list (this will default to the selected activity).
- Enter a correspondence template code (required).
- Enter a document title (optional).
- In the message subject field, enter the message you want to appear in the Subject line of the e-mail message.
- You can select data merge codes from the available fields drop-down list to personalize the e-mail messages with information from the database tables. In the example below, the data merge codes for the customer's name and organization were inserted to personalize the salutation.
- After selecting a code from the available fields drop-down list, it will display in the field to the right of the list.
- Copy the code from the field and paste it into the body of the message.
- When you run the messaging job, the data will be pulled from the database tables and inserted into the body of the message.
- Select the format of the e-mail message (e.g., HTML or Text).
- Click Save.
Where is the Correspondence Template used in CRM?
- In the CRM module, click the Requests group item.
- Select the Add Request group item link.
- The Add - Customer Request page will display.
- The member correspondence template drop-down list is located in the Documents section at the bottom of the page.
This template is used throughout NetForum to facilitate responses to common or frequent requests. Please note that the correspondence templates used in the eMarketing module is saved in a different area from these templates.
Response Type
- Response Type
- How you respond to a customer's request.
Example: Examples of Response Types: phone call, e-mail, mail
To Add a Response Type:
- Go to the Customer Request Setup page.
- On the response type child form, click the Add button.
- In the Add Response Type window, enter the response type.
- Click Save.
Note: NetForum provides a wide latitude on how you choose to use this drop-down list.
The Response Type drop-down list is located where in NetForum?
- In the CRM module, click the Requests group item.
- Select the List Request group item link.
- Select the appropriate customer request
- The Customer Request Profile page will display.
- Select the contact responses child form on the Assignments & Responses tab
- On the contact responses child form, open the yellow folder to the left of the assignment.
- Click the Add button.
- The Add - Contact Request Response window will display.
- Select a response type from the response code drop-down list.
- Enter a summary and details (optional).
- Click save.
Assignment Role
- Role
- The job responsibility of the person handling a customer request.
Example: membership assistant, events coordinator, public relations specialist, accounting assistant.
To Set Up an Assignment Role:
- Go to the Customer Request Setup page.
- On the assignment role child form, click the Add button.
- The Add Assignment Role window displays.
- Enter a role (job responsibility).
- Click Save.
The assignment Role drop-down list is used in FOUR (4) different areas of CRM:
- Add Assignment (Group)
- Add Assignment (Individual)
- Assignments child form on the Customer Request Profile page
- Activity Type child form (see Managing Activity Request Roles above)
- In the CRM module, click the Assignments group item.
- Select the Add Assignment (Group) or Add Assignment (Individual) group item links.
- The Add page will display for each respective group item link.
- The role drop-down list is a required field located in the Assignment section of BOTH Add - Assignment pages.
On the Customer Request Profile page:
- Select the assignments child form on the Assignments & Responses tab.
- Click the Add button.
- The Add - Assignment window will display.
- Select an assignment role from the role drop-down list.
- Select an activity from the activity drop-down list.
- Click save.
Request Action
- Request Action
- An action you took to complete or fulfill the request. These are the linked to the Assignment Tasks for the individual or group to whom the request was assigned.
Example: e-mail confirmation, sent packet, mailed thank you letter, sent invoice.
To Add a Request Action:
- Go to the Customer Request Setup page.
- On the request action child form, click the Add button.
- In the Add - Request Action window, enter an action in the action code text box.
- Click Save.
The Action drop-down list is located where in NetForum?
- In the CRM module, click the Requests group item.
- Select the List Request group item link.
- Select the appropriate customer request
- The Customer Request Profile page will display.
- Select the assignments child form on the Assignments & Responses tab.
- On the assignments child form, open the yellow folder to the left of the assignment.
- Click the [Add Tasks] link.
- The Add - Contact Request Assignment Task window will display.
- The (request) action drop-down list is a required field.
Note: NetForum provides a wide latitude on how you choose to use this drop-down list.
Related Documents
- (Activity) Related Document
- A document that is sent in response to a customer request of a certain Activity Type and reason.
To Add a Related Document:
- Go to the Customer Request Setup page.
- On the related documents child form, click the Add button.
- In the Add Customer Request Document window, select an activity type.
- Select a contact reason code.
- Enter a document code.
- Enter a document summary (not required).
- Enter a document description.
- Enter the author (not required).
- If the document can be found on a Web site, enter the URL address for the document.
- If the document is stored on your network or hard drive, enter the path to the document (i.e., the path to the folder or sub-folder).
- Enter a display name.
- Select one or all of the send check box options (each one selected will be an available option when adding your customer request).
- Click Save.
Tip: The Browse button can help you find and insert the path to the file.
Call Type
The Call Type drop-down list on the Task is set up in the Column definition. Note that some of these values are considered reserved codes that NetForum and should not be changed.
See Also
Organization Change Request - This page contains information on how to set up the Customer Request tables to use the baseline Organization Change Request functionality on eWeb.
To Delete a Value From a Drop-down List:
- On the Customer Request Setup page, on the appropriate child form, find the record you would like to delete and click the Delete
 button.
- You will receive a warning message. Click OK to delete the record from the child form.
Note: After a drop-down list item is used, you cannot permanently delete it. However, you can hide the record from the list by disabling it. To disable the record, check the hide/disable record? check box.
To Hide/Disable a Value From a Drop-down List:
- On the Customer Request Setup page, on the appropriate child form, find the record you would like to hide and click the Edit
 button.
- Select the hide/disable record? check box and click Save. This removes the value from all of the drop-down lists.
Note: There is no show option to reverse the hide option. If you need the value again, you must add it.